WP Facebook Messenger
FACEBOOK MESSENGER FOR WORDPRESS Fastest way to get connected For any sellers and business owners!
Woocommerce
WOOCOMPOSER Page Builder for WooCommerce WooCommerce Page Builder is The Quickest Way to Create from Product Detail Page to Thank-You Page and Everything in Between.
Facebook Live Chat For Wordpress
FACEBOOK LIVE CHAT FOR WORDPRESS The Very First Step of The 2017 Facebook Marketing Strategy
Yoast SEO
WordPress out of the box is already technically quite a good platform for SEO.
Contact Form 7 Multi-Step
CONTACT FORM 7 MULTI-STEP Featured on our Best WordPress Plugins Adding steps for your complex form The best solution to keep the form clean and simple to your visitors
Showing posts with label newbie. Show all posts
Showing posts with label newbie. Show all posts
Saturday, November 18, 2017
The plugin required for a wordpress blog
You know how to install the plugin and use the plugin, and
this is also the outstanding feature of WordPress.Org compared to
WordPress.Com. But avoid the plugins do not know or do not know a lot of
plugins, I have a list of instructions of each plugin that he considers to be
necessary and you should install no matter what your site.
The following plugins have detailed instructions at Hatachi Nara, please click on the plugin name to see the most detailed
instructions.
JetPack - A collection of useful tools for WordPress (not
installed at localhost).
Akismet - Strong anti-spam comment.
Advanced TinyMCE - Add editor buttons to WordPress.
Yoast SEO - SEO support for the best WordPress.
WP Super Cache - Caching to speed up your website.
iThemes Security - The most popular security plugin for
WordPress.
Contact Form 7 - Create the best contact form.
Responsive Lightbox by dFactory - Create a lightbox effect
when you click on a photo to view a larger image.
ReplyMe - Send a notification when someone responds to a
comment.
Disqus - If you want to use comment system like
Thachpham.com then install.
These are the plugins that you think you should install on
any kind of website, of course besides the plugin you can install any plugin
that you think fit.
Those are the plugins needed for a wordpress blog, of course
each blog has its own fields, And I dare you with a lot of plugins that match
the field that your bolg is active, With the huge plugin store you spoiled for
choice of plugins suitable for you.
Monday, November 6, 2017
WOOCOMMERCE OPTIMAL ROAD
By default, when installing Woocommerce, you may find that
the products have not very nice links, but if you want the product paths and
product directory paths, the product keyword is better then we should. Enable
static path for Woocommerce. In this article I will talk about how to install
and some tips related to static path optimization.
ESTABLISHING THE PROVEN ROAD FOR WOOCOMMERCE
To set this up, you have to go to Settings -> Static
Routes.
Then, in the common installation you have to select the path
structure calculated for WordPress before to activate the feature.
And in the optional section, you will see that there are
additional sections for the product including:
·
Product category default: Means the base name on
the path to product catalog pages. An example on the path to the list will be
https://thachpham.com/danh-muc-san-pham/quan-jean/ then the name of the
muc-san-pham is the name of the base for the category. For some reason, you
should set it muc-san-pham or something other than muc-san-pham because it will
get a 404 error if it is named.
·
Default product keyword: Same as above but for
product keyword pages.
·
Default Product Attribute: Same as above but for
archive pages for product attributes.
Note, you can not use accented Vietnamese. I will correct as
follows to not error:
And below is the default static link of the product or in
other words easier to understand the static path structure for the product
page. Here you can choose the structure that you like but avoid selecting the
structure with the Vietnamese mark as it will fail. For example, I want my path
is https://thachpham.com/san-pham/quan-levis will set as follows:
Or if you want to link the product containing the product
category name of the product then set as follows:
DELETE LIST OF PRODUCT LIST AND PRODUCT LIST
I write it so that it matches the translation but if it is
correct to delete the base name for product paths and categories. Above you
will see that each time you enter the path of the product list will have more /
product-catalog/ on the path and for the product will have more / product /. If
you want to delete those two, then install these two plugins.
First, install the Remove Taxonomy Base Slug and activate
it. Then go to Extract Package -> Remove Taxonomy Base Slug and select
product_cat and product_tag (press shift to select) and click Apply Changes.
Finally go to Settings -> Static Path press the Save
button again so it flush permalink.
The next step is to remove the plugin from custom post type
and activate it, then go to Settings -> Static Path and press the Save
Changes button.
ADD .HTML for the product
When you install the plugin remove slug from the custom post
type is in the plugin that has added support for suffix for the path. You go to
Settings -> Custom post type and fill in the html.
Then go to Settings -> Static Path and press save button
to change it to update. Now go back to the homepage and click on the product
will see the product has .html in the tail already.
EPILOGUE
That is some of my experience in optimizing Woocommerce's
paths, first of all giving it a nice boost and of course the second is for the
path structure that it's SEO standards are all right. Wish you success.
note: Because today my site has problems so I can not edit the English language, so the image will have another language
Thursday, November 2, 2017
ADD AND REMOVE THE WIDGET IN THE WORDPRESS WORK
When it comes to widgets in WordPress, you probably think of
the widgets that appear on your site. However, the widget I mentioned in this
article is not for displaying outside the website but as a widget within the
admin page, which is located in the Dashboard as shown below.
And in this tutorial I will show you how to delete the
default widgets as well as create a new widget in the admin page to use it to
display some of the information you want.
How to delete the default widget in the admin page
If you are like me, the widgets in the admin page almost do
not use it a long time because it is too little information, just as we should
delete it to avoid seeing it again.
To do this, we will create a function and hook it into the
action hook named wp_dashboard_setup.
|
01
02
03
04
05
06
07
|
/**
* Delete the default widget in the
admin page */
function tp_remove_default_admin_widget()
{
}
add_action( 'wp_dashboard_setup',
'tp_remove_default_admin_widget' );
|
And then in this function we use the remove_meta_box
function to delete the widget here. We use this function because these widgets
are meta boxes created for page type called dashboard. For example, if you want
to remove the WordPress News widget, you have the following:
|
01
02
03
04
05
06
07
08
09
|
/**
* Delete the default widget in the
admin page
*/
function tp_remove_default_admin_widget()
{
remove_meta_box(
'dashboard_primary', 'dashboard', 'side' );
}
add_action( 'wp_dashboard_setup',
'tp_remove_default_admin_widget' );
|
Similarly, you can see a list of the default dashboard names
here and want to delete which one then copy that into your function.
In case you want to remove the welcome display in the
Dashboard, you must use remove_action (), and place the code outside of your
function.
|
01
|
remove_action( 'welcome_panel',
'wp_welcome_panel' );
|
How to create a widget in the admin page
Usually when creating a website for a customer, we may need
to use the Dashboard to post a reminder notice, or advanced features such as
getting the latest news on our site, or updating the price of gold. Something,
... depending on the level of your code.
In this tutorial I will teach you how to create a simple
widget and a widget to display the latest posts on your page via RSS.
We first create a separate function and hook it into the
action hook named wp_dashboard_setup. And in this function we use the function
wp_add_dashboard_widget () to create a new widget.
|
01
02
03
04
05
06
07
|
/**
* Create widget in admin page
*/
function tp_create_admin_widget_notice()
{
wp_add_dashboard_widget(
'tp_notice', 'Reminder notes', 'tp_create_admin_widget_notice_callback' );
}
add_action( 'wp_dashboard_setup',
'tp_create_admin_widget_notice' );
|
In the above paragraph, we have:
|
01
|
wp_add_dashboard_widget( 'tp_notice', 'Ghi
chú nhắc nhở', 'tp_create_admin_widget_notice_callback' );
|
Inside:
tp_notice: ID of
the widget, the ID must not be the same as the other widgets.
Reminder notes: The
title of the widget
tp_create_admin_widget_notice_callback:
The name of the function that it will execute in this widget, where you
can understand what this function contains is what it displays in the widget
whose ID is tp_notice.
Okay, now let's create the function tp_create_admin_widget_notice_callback()that
we have declared above to display the content of the generated widget. In this
function we temporarily display a simple text.
function tp_create_admin_widget_notice_callback() {
echo '
This is sample content in the tutorial on how
to create a simple widget in the admin page..
';
}
Since you have full access to the PHP code in this section,
you can create your own content here.
The mechanism of use is just that. But hopefully once you
know the simplest things, you'll be able to easily find better ways to use
widgets in the more useful administration page.
Monday, October 23, 2017
[WOOCOMMERCE] CREATE A PRODUCT LIKELY
In addition to the simple products that we will use
regularly to add more common types of products, Woocommerce also adds another
type of product that you will often see in professional sales websites, that is
the product have attributes.
For example, you have T-shirts and customers can choose the
information when ordering, such as color, size and information to choose which
is the product attribute. In Woocommerce, you can set up a product with
multiple properties, then give it an external appearance or give it an option
when it comes to purchasing and it also helps you set a product price for each
attribute.
ADD TO TYPE OF STYLE
The text style property means that it displays additional
information about the product and the user can not select it, or we can not set
a price and image for it. The purpose of this kind of attribute is for the
customer to refer, for example hardware information of the electronic device.
First, we go to the Products -> Properties section and
create a new text type property.
The storage section means that we allow WordPress to create
a separate archive for this attribute with its own path to classify products by
attribute, which is good for SEO, so choose it.
The last step is to declare this attribute for the product,
you can either edit an existing product or add a new product to add attributes
to it.
For the product data, select "Properties", then
select the product attribute to apply and press the additional button.
After we finish adding this value, we will declare the
display value of this attribute, you can use the | symbol to separate values
from each other.
When saving the property, remember to update the product so
it starts saving.
Now you go out to see the product will see more information
and where it will display the text properties.
Of course, you can add different text style attributes.
Add a style attribute of choice
Attribute-type properties will have a different point: we
can enter different prices for each attribute, and customers can choose to buy
the style they want. Like when we buy clothes online will have a choice of
color, size.
First, we also go to the Products -> Properties section
and create the type property. And another feature of the select attribute is
that you have to set the attribute type (in other words, the value of the
attribute). Click the circle icon on the property management section.
And here we need to declare the values that we will use on
the products.
Next, edit or create new products that require additional
attributes. Product data, you choose is the product variant.
Next to the attributes, you add the style attribute you just
added, remember to add the attribute values you want to use for this product,
and mark the section for multiple variations.
Then go through the variants and add variants of this
product.
You can then set up detailed information for each variation
that this product has been supported by.
Each variant you click on it to set image, price, quantity
in stock, ... and if you want to add more variants than press the button to add
variation.
You can press the variation button and do the same with the
other variations you want.
It's simple, is not it, but do you want to make product
attributes and product options more professional? Take a look at the next
article that I will introduce you to a great plugin for this option more rich.
Thursday, July 20, 2017
Wordpress installation guide for newbie
In this
article, HATACHI NARA will guide you to install wordpress in the fastest way including the
most necessary installation steps.
I and you
start together!
Prepare host and domain
Want to
install wordpress, you first need to have a host and domain, These two are required to buy, if not
you should try to find out if you want to install wordpress. As soon as you
have a domain, you must point it to the host, so the preparation step.
How to install wordpress fastest
Usually in
the cPanel X panel (the popular panel type when you buy a host), it has a
built-in WordPress feature.
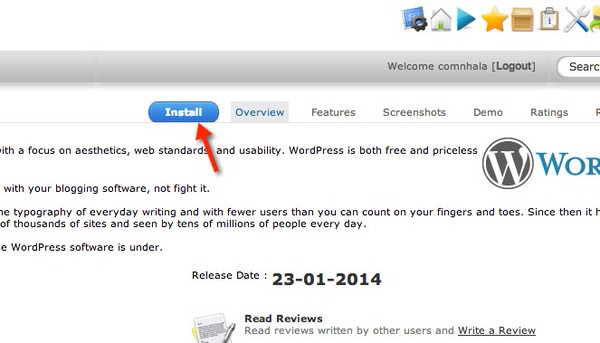
You have to
log into cPanel then scroll down to find the Softaculous and Apps Installer
and click on the wordpress icon.
Then you
press the install button at the top.
Next, select
the domain you want to install and set up.
After
setting up your domain, you will have a domain name such as hatachi.com for
example. And when people type in the domain name, your site will show up. And
at the bottom you will see an item named In directory that you can enter anything
in, but I advise you to leave that section blank.
In the
Database Name field enter the name of the database you want it to automatically
create, you should remember this database to avoid deleting the database in the
MySQL Database management page in cPanel.
In the
Database Setting section, leave it blank, ie keep wp_.
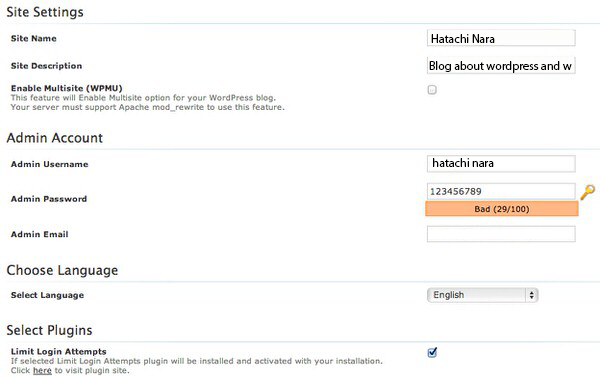
Scroll down
to the bottom of the page you will be set parameters such as website name,
description, email and administrator account. This is the sample I entered.
Then you can click the install button to install and wait a few seconds, until this image appears like this.
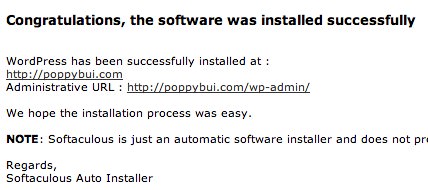 |
| Notification of successful installation |
In this it
shows the website path and login path to the admin page.
Now i and you go to
the administration page and log in with the information you created earlier.
Install the
necessary settings for the wordpress site.
After
installing wordpress you should install the necessary settings for the website
to make the site work better.
To install
the settings menu, select General.
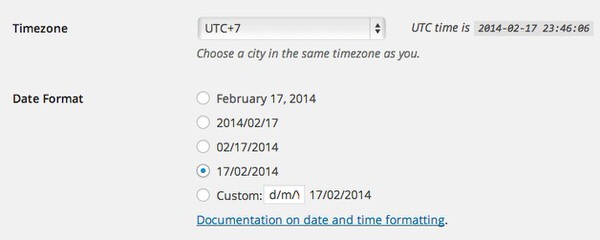
Reset the
time zone accordingly, reset the date.
When you set
the date and time then you do not forget to save seve changes. Continue through
the permalinks and structure as shown below.
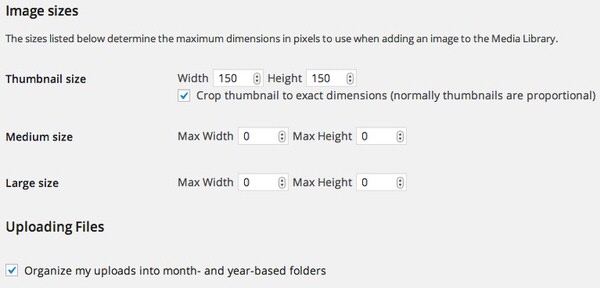
Continue to
select Media and Setup.
Ok, the
necessary steps are considered finished.
Install a new theme.
After
installing the basic setup steps. If you are not interested in the theme that
wordpress has, you can proceed to install other theme to fit your field.
For newbie
you should read article 10 most beautiful free wordpress theme 2017 to choose a
suitable theme that is free.
Install plugins for wordpress
A wordpress
website will not stand out and powerful without the theme and plugins for
wordpress support, so after you install theme you should install some plugins
for your wordpress website.
Examples of
plugins needed for wordpress like yoast SEO, contact form 7, plugins live chat,….,
Last words
Here comes
almost what you need to do to have a wordpress site, you should find more
plugins support for wordpress to boost the power of your wordpress site.
Do not
forget to visit other WordPress related forums at HATACHI NARA for the best
tips and experience using WordPress.
Was the
article helpful? If you
remember to share for everyone to read offline.
Related article
Subscribe to:
Posts (Atom)


